Friday, February 27, 2015

Frozen water

Chickens need fresh water all day long!  At night they are in the coop and sleeping, unless the bitter cold makes us move food and water in, they just sleep at night.  When it is so cold, how do we keep the water from freezing?  Well, there are many ways I researched to accomplish this feat.  A heater from the bottom can work, but with our set up it was a better idea to wrap the water can with heating tape. This I researched, then found at the feed store.  That day they were out of under water fount heaters anyway so the heat tape was my option.  Usually it is used for pipes you don't want to freeze, such as outdoor spigots.  I recently needed to re-tape one of our water cans and here is the result:
 
It is basically an electric cord wrapped in plastic so it won't get wet.  The orange does not get covered, but the rest can be secured with electrical tape.  I washed this outside piece of the water can, then dried it so the tape would stick.  The green cord is from our previous clothes line, and is what we hang the feeder and water can with out in the coop.  This somewhat short piece of heat tape is working well for our can, unless it is super cold outside.  If we hang it in the coop it usually makes it though a cold night, but the extra moisture in the coop can lead to frostbite for the ladies and Mr. Roo.  He has had some issues with the tips of his comb and frostbite, so I try to avoid that at all costs.  Those beautiful brown eggs are almost all water, so if they are without water even for a couple hours during the day, egg production will go down.  Here's to another cold day, with water! 
 
 A day without snow, so free ranging was a must! 

We have an extension cord from the outside plug by the house that reaches out to the coop.  Then the heat cord is hooked up and we have water!  This was a warm day since the water can on the right is also liquid without a cord. 
 

Winter treats!

Since we have had snow on the ground for the longest stretch this winter, the ladies, and Mr. Roo, are getting a bit bored.  When it is not too bitterly cold out, they do venture to free range.  BUT with all the snow what is there to find?  They scratch and find some leaves, or on 35 degree days they might get another dirt bath by the sunny front window, but otherwise it is mostly slim pickins'!  The kids have played with the field corn from the garage enough in their pretend "farms" that the hens can find piles of corn hidden in the snow, but they LOVE scraps!  We basically save any food scraps from the kitchen unless they are rotten, burn, or citrus.  These things the chickens won't love.  They run to me, after me, and follow me to the coop when I am coming out of the house with a bucket.  They just race to get the leftover noodles, veggie scraps, and meat bones!  It is quite funny to see them fight over little jewels of food we deem trash. 
These pictures are from earlier in the year when I wasn't freezing my hands off to take pictures.  YUM Macaroni!

Hey lady, we raced you here, where is the food!  Got any of that steak from dinner last night?
 
Our chickens always get feed from the store or local elevator, with scraps as treats.  We also supplement with some corn and soybeans in the winter for extra body warmth.  It is all mixed together and only fed for the coldest days as too much corn can heat them up too much, and be hard to digest after prolonged feeding.  We grind the corn ourselves with our heavy duty blender, and the beans have to be boiled, baked, and ground a bit for them.  The soybeans have an enzyme that is harmful to be ingested unless they are cooked.  I HATE the smell in the kitchen when Alex is baking the beans, but luckily my essential oils, Purification to be exact, kick the smell immediately once diffused. 
 
Soybeans being baked/dried after boiling. 
 
Also, on the really really cold days I give them warm oatmeal.  They scarf it down, and sometimes a second helping is needed for the adolescents who get left out, and the bantam who can't always squirm her way into the fray.  I am looking into other treats to hang with grains they would love.
  
This is the usual scene lately, only the brave peek out to see if the snow is gone.  I leave the door open, but usually they stay close to the coop on these days. 
 
Get ready for warmer weather, their favorite treat is.........Watermelon rind!  It is picked clean down to only the green skin layer.  They devour it!  Also, grapes are pretty comical to watch as they fight over them :)  Keep Warm!

Sunday, February 22, 2015

Laundry and Dish washer soap

So a few years ago I was having major trouble with our dishwasher at the time.  I was always getting white film on the dishes after they went through the normal cycle.  It was a new washer after redoing our kitchen, and I tried everything!  New soap, rinse agent, different cycles......noting was working.  I decided to research some recipes and make my own.  I have not gone back since!  I use vinegar as the rinse agent, and have had great success between moving to new houses, and different types of water.  I use a small scoop from an empty formula container.  One scoop per load is just enough.  I do guard you against closing the lid of your container as soon as you mix it.  Mine tends to solidify into a huge chunk unless I mix it and then let it "air out" for a bit.  The ingredients get rid of the moisture they hold, or from their interaction, and I have little to no clumping then.  Here is the dishwashing powder recipe:

2 cups Borax
2 cups Arm & Hammer washing powder/soda
1 cup Lemi Shine
1 cup kosher salt
Essential Oils if you like a favorite scent - lemon, citrus fresh or lavender are my choices usually

I measure and mix in my plastic container from the dollar store, then close the lid and shake to mix it up.  Remember, leave the lid off for a while then close and shake again, or mix with a spoon so it doesn't clump on you.  Enjoy!  Cheaper, easy, not so many harsh chemicals, and clean dishes!


The heart towel represents how much I LOVE my washing powder, but right now HATE the clumps.  This is rock solid and I have to chip away at it for a scoop.  Mind the warning in the recipe to leave the lid off for a while after you do the first mix.  Then recap and shake some more. 


This worked out so well I thought I would try my own laundry soap.  For a family of 6 now, including cloth diapers some weeks, we have a TON of laundry!  I needed a more cost effective way to do my loads, and have fresh clean clothes, while getting out stains. 


I again researched and found one that I adapted to meet my needs.  I mix a large batch and keep it in two plastic containers.  I use about 2 tablespoons of detergent per load.  This mix is for general laundry and not my cloth diapers, that is another recipe to come later :)

1 box Borax
1 box Arm & Hammer Washing Powder
1 bar of pure castile soap, Fels Naptha, Ivory, or any other natural unscented bar soap
Baking Soda added per load by the tablespoon to freshen laundry, and sometimes Oxyclean for really dirty, from the coop/play all day outside clothes

I mix these into a tub or large bowl.  The bar soap I grate on a cheese grater, or give a quick blend in my mixer or food processor if I need the chunks smaller.  Then stir until incorporated and use!  Once I even had a bar of peppermint castile soap and LOVED using that for something different.  Nothing like keeping the bugs/spiders away from sleeping babies like peppermint scented PJs!

Chick update

Remember those adorable balls of fluff my husband couldn't resist at the store last month?  They are growing!  We increased the size of their brooder box, gave them larger water and a bigger food trough.  Now they are planning their escape!

No not really :)  Some have a tendency to perch more than others. They hop right back in, for now...

The wire piece of shelving is supposed to be a perch, but they keep knocking it over.  They also have been scratching in the shavings a ton!  This has made a huge mound on the end opposite the lights covering their food. 

 
This was actually about 2 weekends ago, 60 degree weather!  This meant a field trip outside with Tootsie the guinea pig!

Monday, February 16, 2015

What's for Dinner?

So we LOVE our chickens, and we LOVE our eggs, but honestly they were never meant to be pets.  Now that we have hatched two of our own, we will probably have those two until they die of natural causes, and Isaac already named them......

When our first chicks were getting bigger into adolescent stage we noticed that three of the four cute little Bantam chicks were now feisty, hormonal, mean, fighting, teenage boy, ROOSTERS!  What were we to do?  We didn't want to rid ourselves of these we had raised from babies, but man were they mean!  Roosters of course fight, and protect, but it just got to be too much.  We had to sacrifice the three little Roos.  It was something we never planned on, but as a couple we tackled the challenge.  We watched YouTube University for tips and techniques, and check some chicken raising blogs to see how others butcher their own meat.  We made sure we had the kids away from the hatchet and beheading, but they did watch the hanging and plucking part.  Not only do they now know where their eggs come from, they truly had a meal farm to table. 

Alex first got a fire started in the fire pit outside. Then we used a large canning pot to boil water.  This is to dip the chicken in to "blanch" them so that the feathers come out easier.  The first one we put in too long and learned the hard way that you really only need 30 seconds or the skin comes off too.  He set up a large piece of plywood on two buckets for a table, and we used our outside swing stand for the hanging. 

He learned that if you swing them around by the feet first then they are a bit stunned and it is easier to "take care" of them and not have them running around your yard like the headless horseman.  After they hung for about 30 minutes he dipped them and we stared pulling feathers.  We joked about keeping them for feather pillows but I nixed that idea.  Then he gutted them and got rid of the feet.


I wanted to try roasting them so they went right into the oven.  After the allotted amount of time we had roast chicken for supper.  Or so we thought......these little Roos were laughing at us again!  They were so tough there was no eating roast chicken that night!  Instead I stuck them in a large stock pot and started the boiling down process of chicken noodle soup.  After simmering for a day I removed all the bones and we had much more tender, and tastier meat.  I added spices, used the broth from the simmering, and threw in some carrots, with the noodles going in last so they weren't so mushy.  It was sooooo yummy!  We had so much extra from the three Roos that we froze it.  Guess what is perfect for a cold night?  Homemade Chicken Noodle Soup!  We have plenty for tonight, tomorrow, and leftovers all week!  Thanks wonderful chickens, we love you!

Tuesday, February 10, 2015

My Special Ed training is coming in handy :)

So when we ventured to try our own incubation we ran into a few problems.  First, we were blessed by a dear friend giving us her incubator which she had used for years at her in-home daycare.  She is going to use it once more this spring and bring us the chicks that hatch!

When I taught Kindergarten for two years we hatched chicks as a life cycle demonstration.  The first year was successful with 8 out of 18 hatching, with only one that had a bad leg.  Instead of sending her to the farm she went to the mother of my teaching partner to live a great life in the big backyard. 

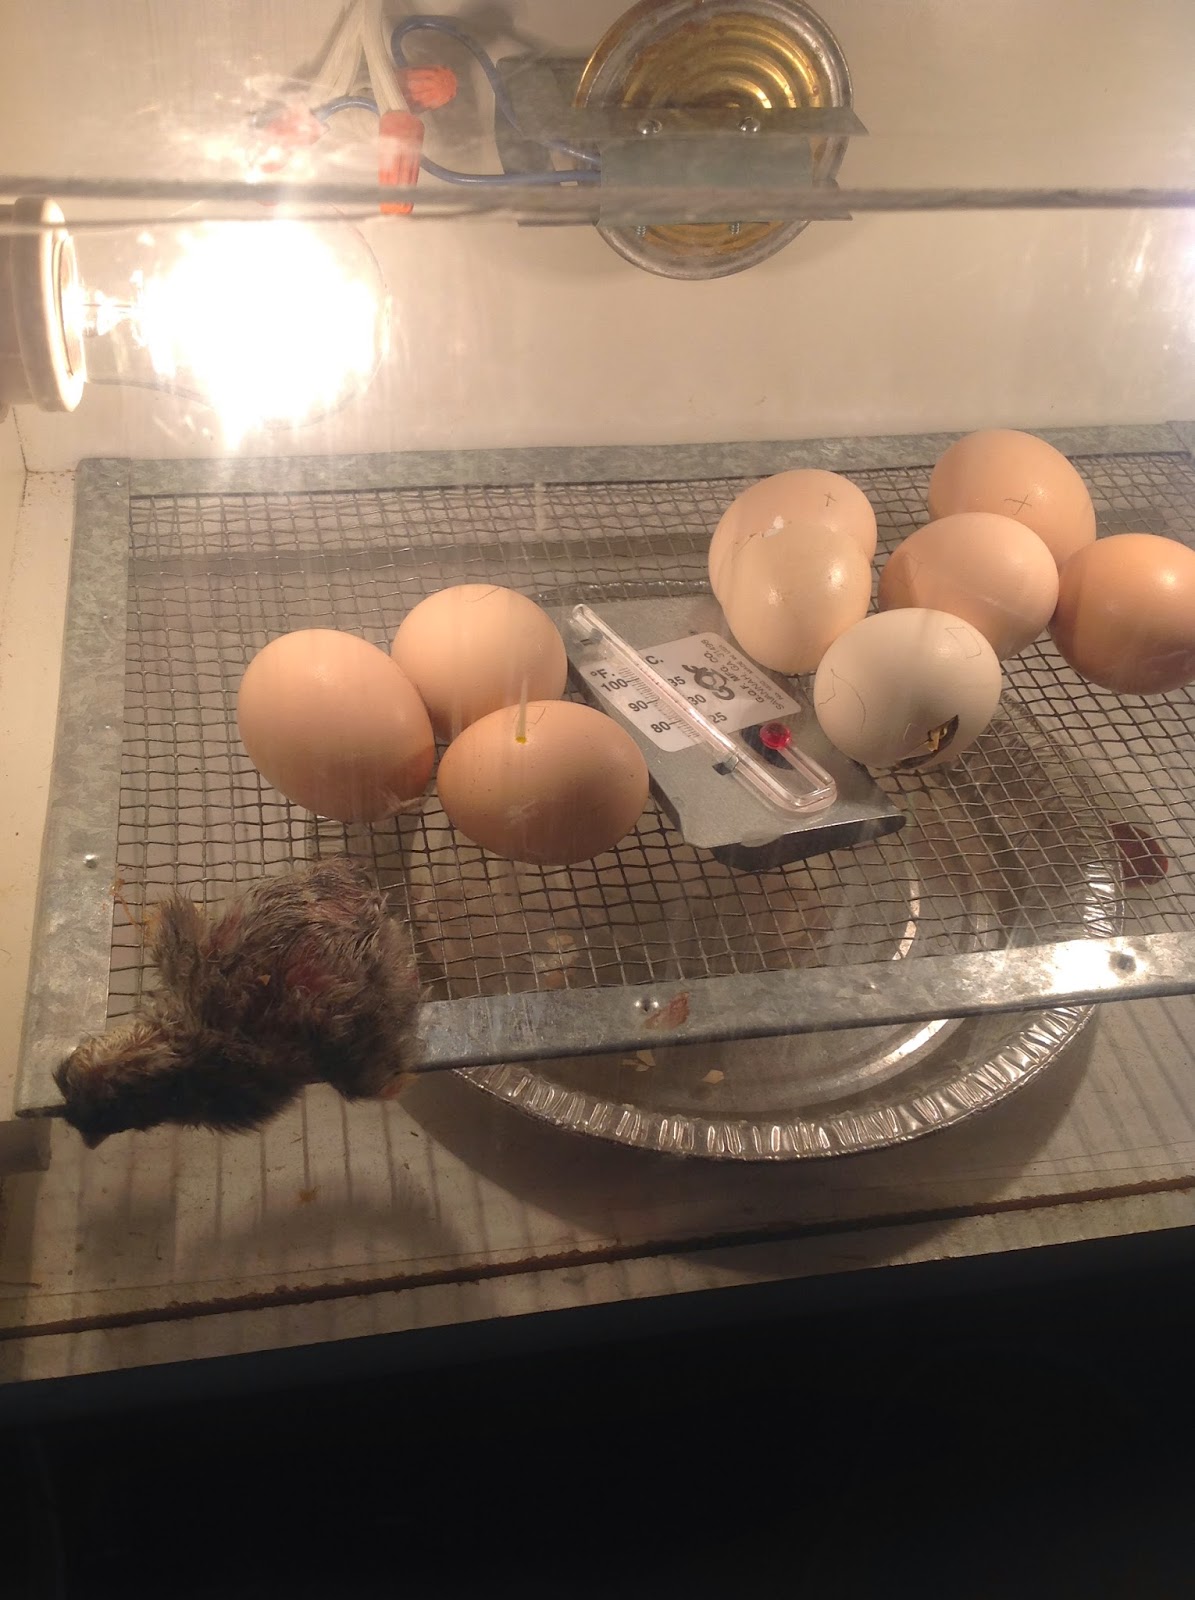
Fast forward to this year, 2015 hatching.  We set everything up and got 34 eggs from outside.  I read the manual, various blogs and websites for information.  We made sure the temperature was level at right around 101 and set our clutch of eggs.
 

They were marked with X and O so that when turned three times a day we knew that we turned them.  This prevents the embryo from sticking to the egg in any one spot.  After 3 days we candled them to see who was fertile.  We had very good fertile percentages, 22 out of 34 seemed to have babies in them.  We read that 80% of these could hatch. 

As the days stretched toward the 21 day mark we turned, watched the temp, and kept the water an full.  After candling again some were gone due to who knows why, so they were removed.  As we came upon the 18th day, the last day to turn them, we got very excited.  We candled them a last time to see who was left, and many were still growing, ready to hatch soon we hoped. 

As the 21st day passed we got a bit nervous.  We read about temperature problems, and inbreeding issues.  After 21 days and no piping(small crack where the chick starts to get out) we candled again.  We saw a lot of dark eggs so we waited.  At 23 days we started opening them to see what was wrong.  This was a simple on the farm thing to do, but I couldn't handle it after two came out still alive but not ready to hatch.  They were breathing but the yoke was not fully into their abdomen yet.  This is the last stage of development that should happen in those 3 or so days you don't turn them.  We realized that our temperature was off, so we moved the thermometer and started praying for a miracle.  We had tried to save the little ones we found, but it was not possible, they passed after a few hours.  They can not live if they are not fully developed. 

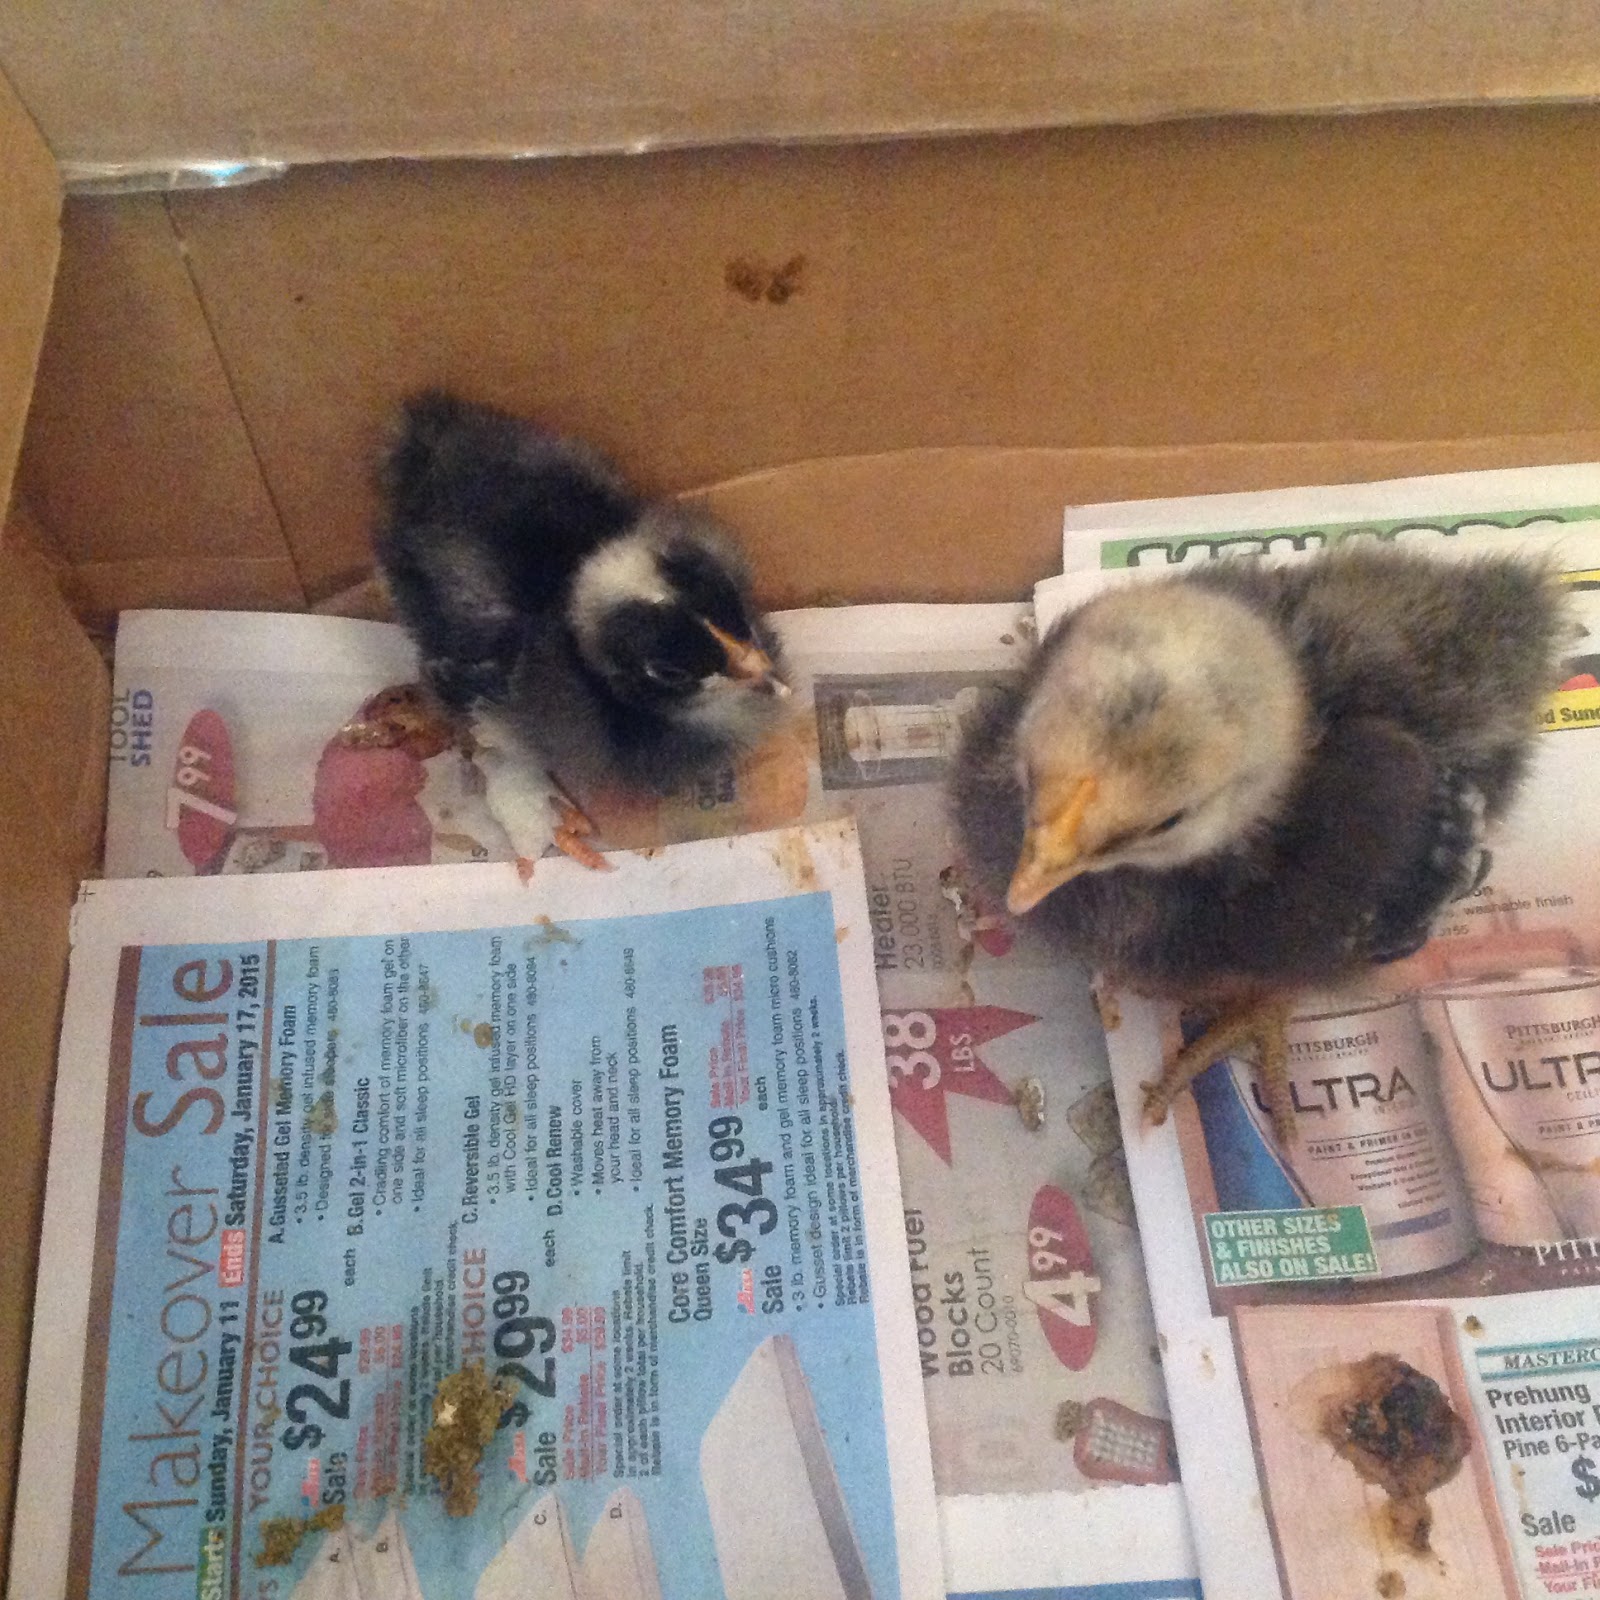
After that night I was very down about the whole thing.  I felt so much like a failure.  Life is so important to us, I felt I had done something very wrong in the incubation process.  Luckily, nature lifted my spirits.  The very next day, as we were planning on cleaning out the incubator and trying again, one started hatching!  Then two!  The first, Rockstar, was very strong and hatched within 8 hours of piping.  The second, Rocket, needed a bit of help after 12 hours since he was getting a bit dry and "stuck".  I was just so inspired that life had prevailed!
Rockstar drying off, and Rocket making he way out :)
After both were out and dry I had hope again!  I could do this!  We cleaned it out and were ready to try again :)

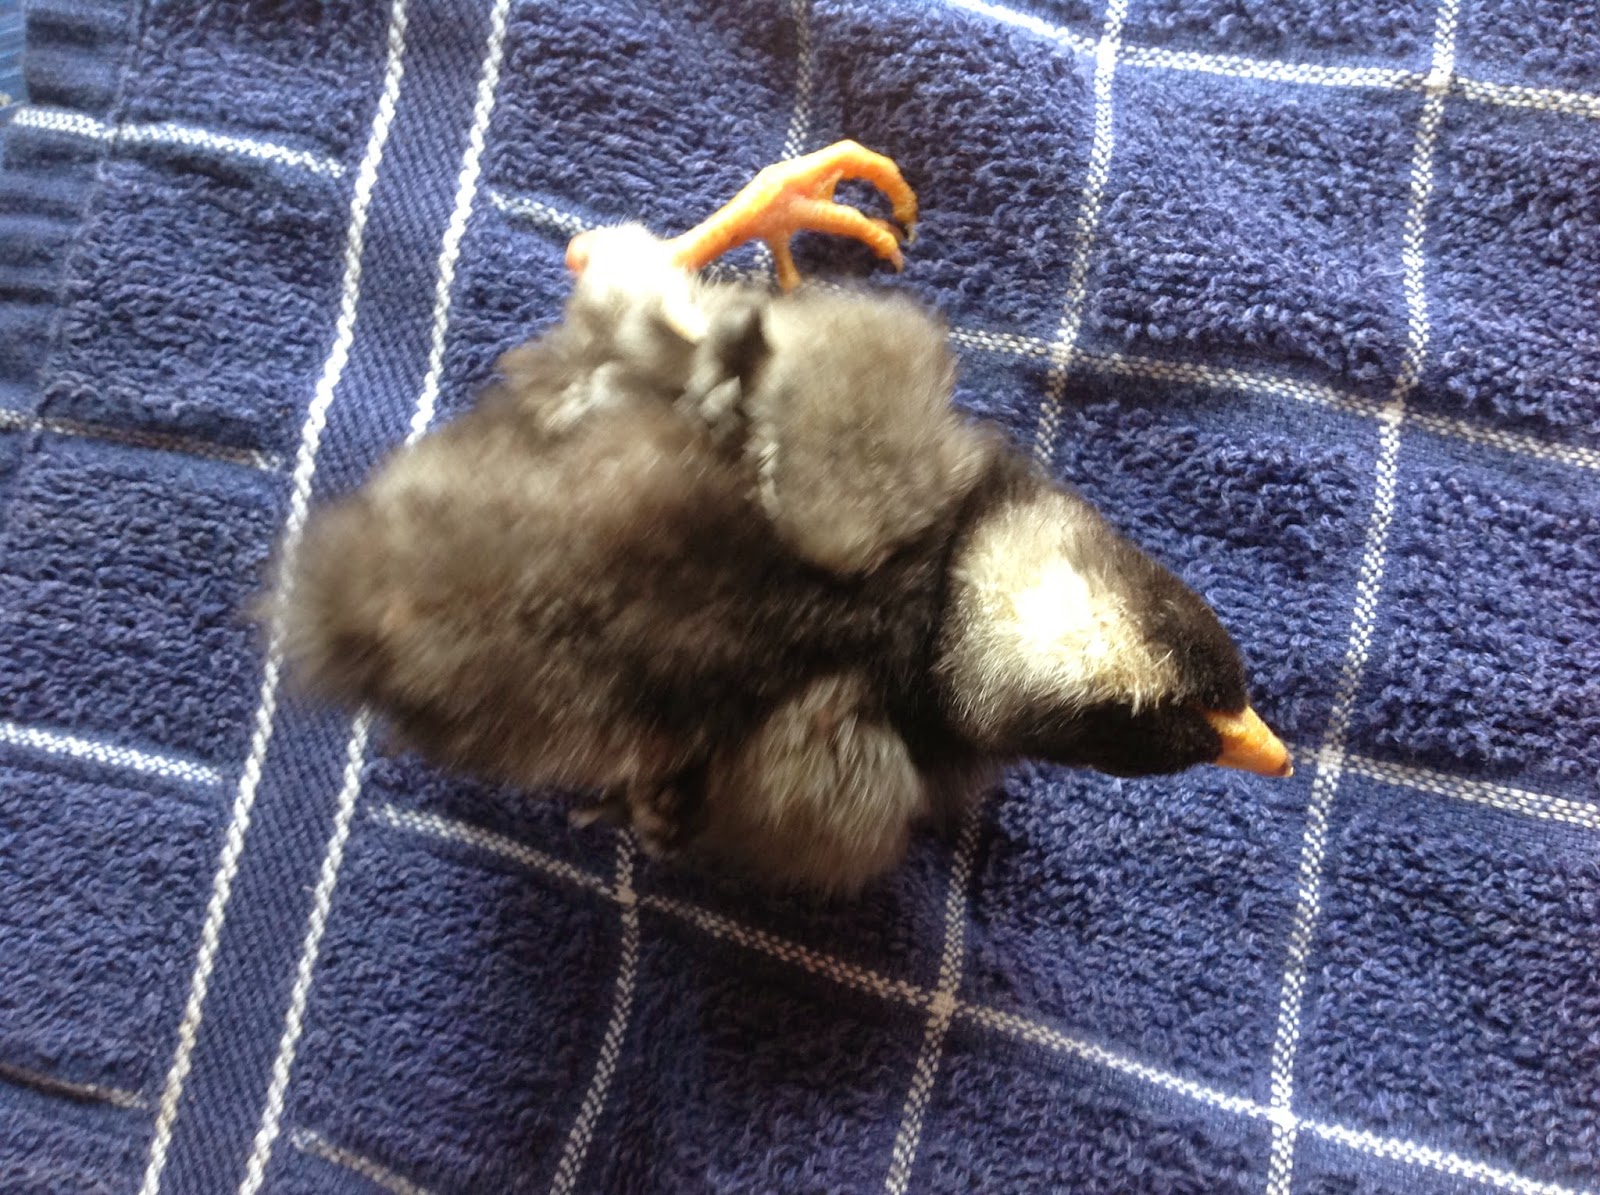
We did notice that Rockstar had some leg issues.  I read that it could be fixed if it was straddle leg, where the legs bow out due to temperature, or the surface it walked on as soon as it got out.  I got some Vet Wrap, or wimp wrap as we used to call it, and made him some booties for his/her curly toes, and leg splints.  We also added that no skid kitchen shelf liner to help it grip the ground.  Wow, how frustrating!  You try getting tiny sandals onto a squirming chick while making sure the wrap is not too tight, or loose!  This did not fix the problem though, and we think he/she has some developmental issue due to inbreeding.  We know he/she is a Barred Rock and could have been from the two Barred Rock chickens we have that were part of the same bunch we got at the store.  This would mean sister and brother chicken had a baby....oops!  We are still taking care of him/her in the dining room.  What a strong spirit it has!  It now eats and drinks on its own, but its feathers are not quite growing in correctly.  We will help it along as much as we can since it has such a resilience for life!  It is a true inspiration.
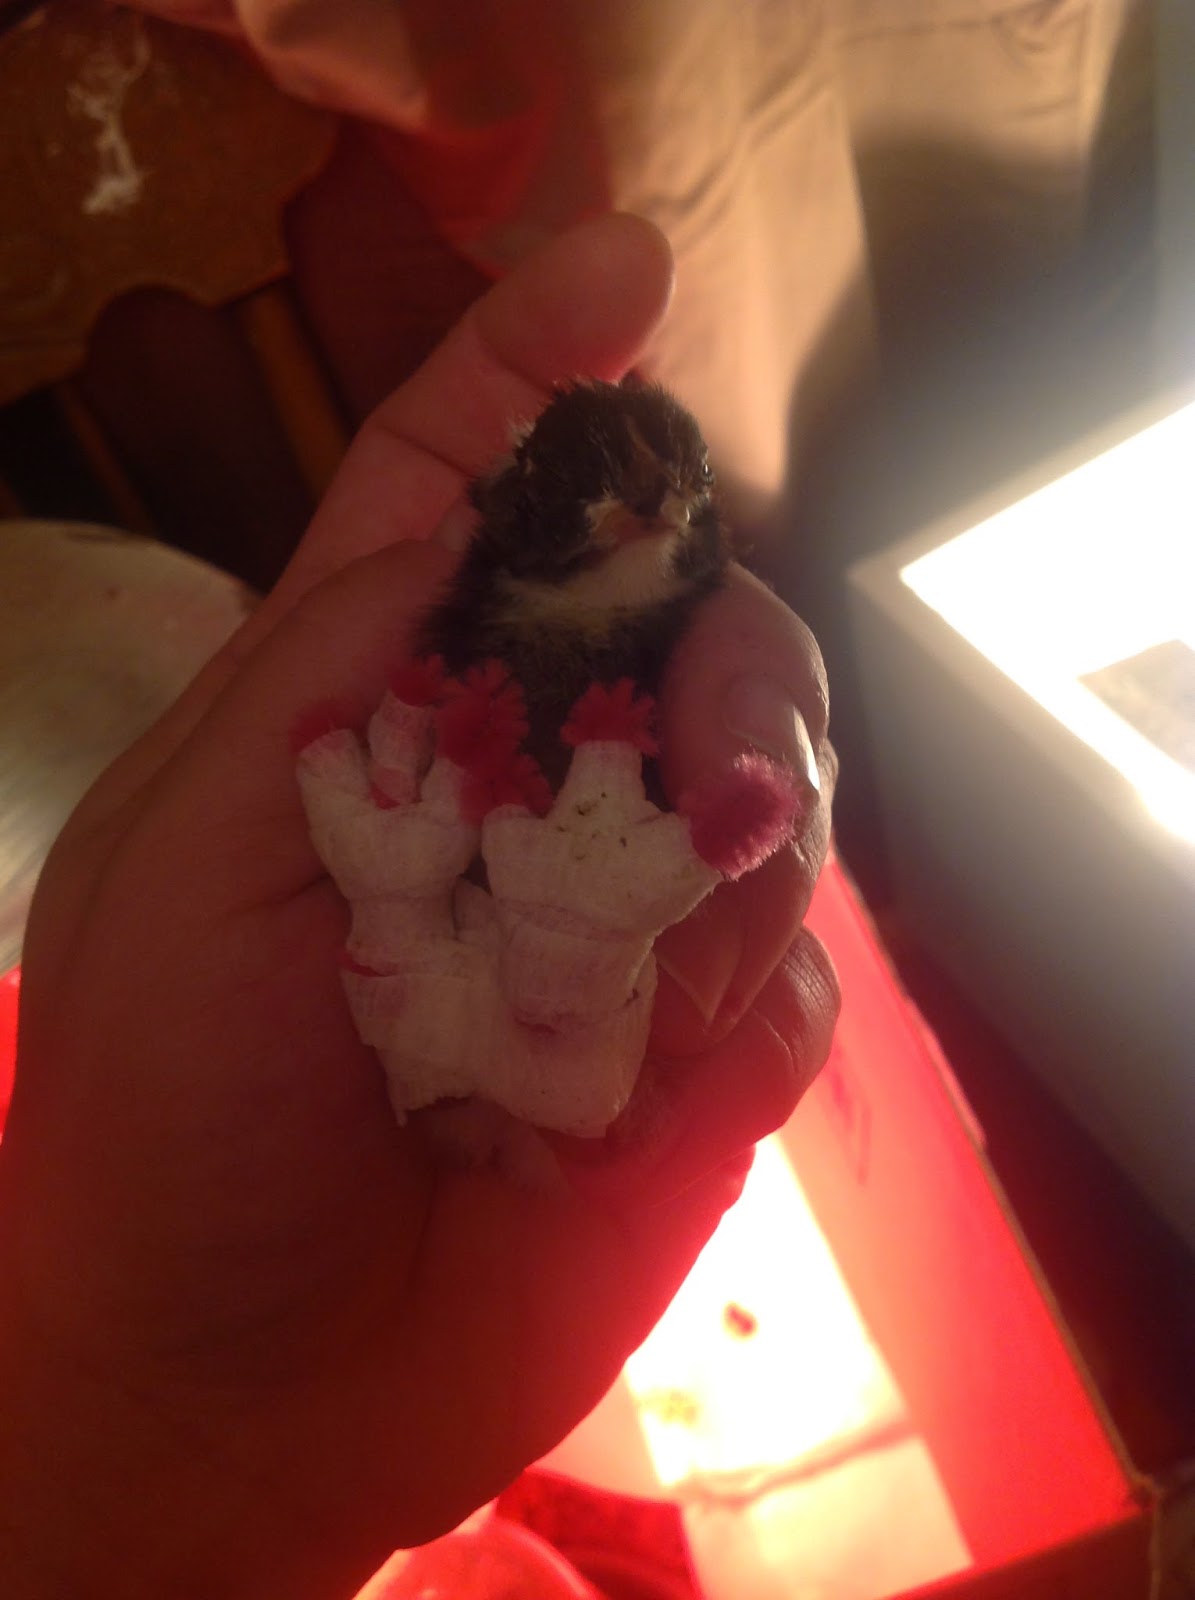
The first OT/PT for a chick I have ever helped with!
Odd feathers, and some missing.

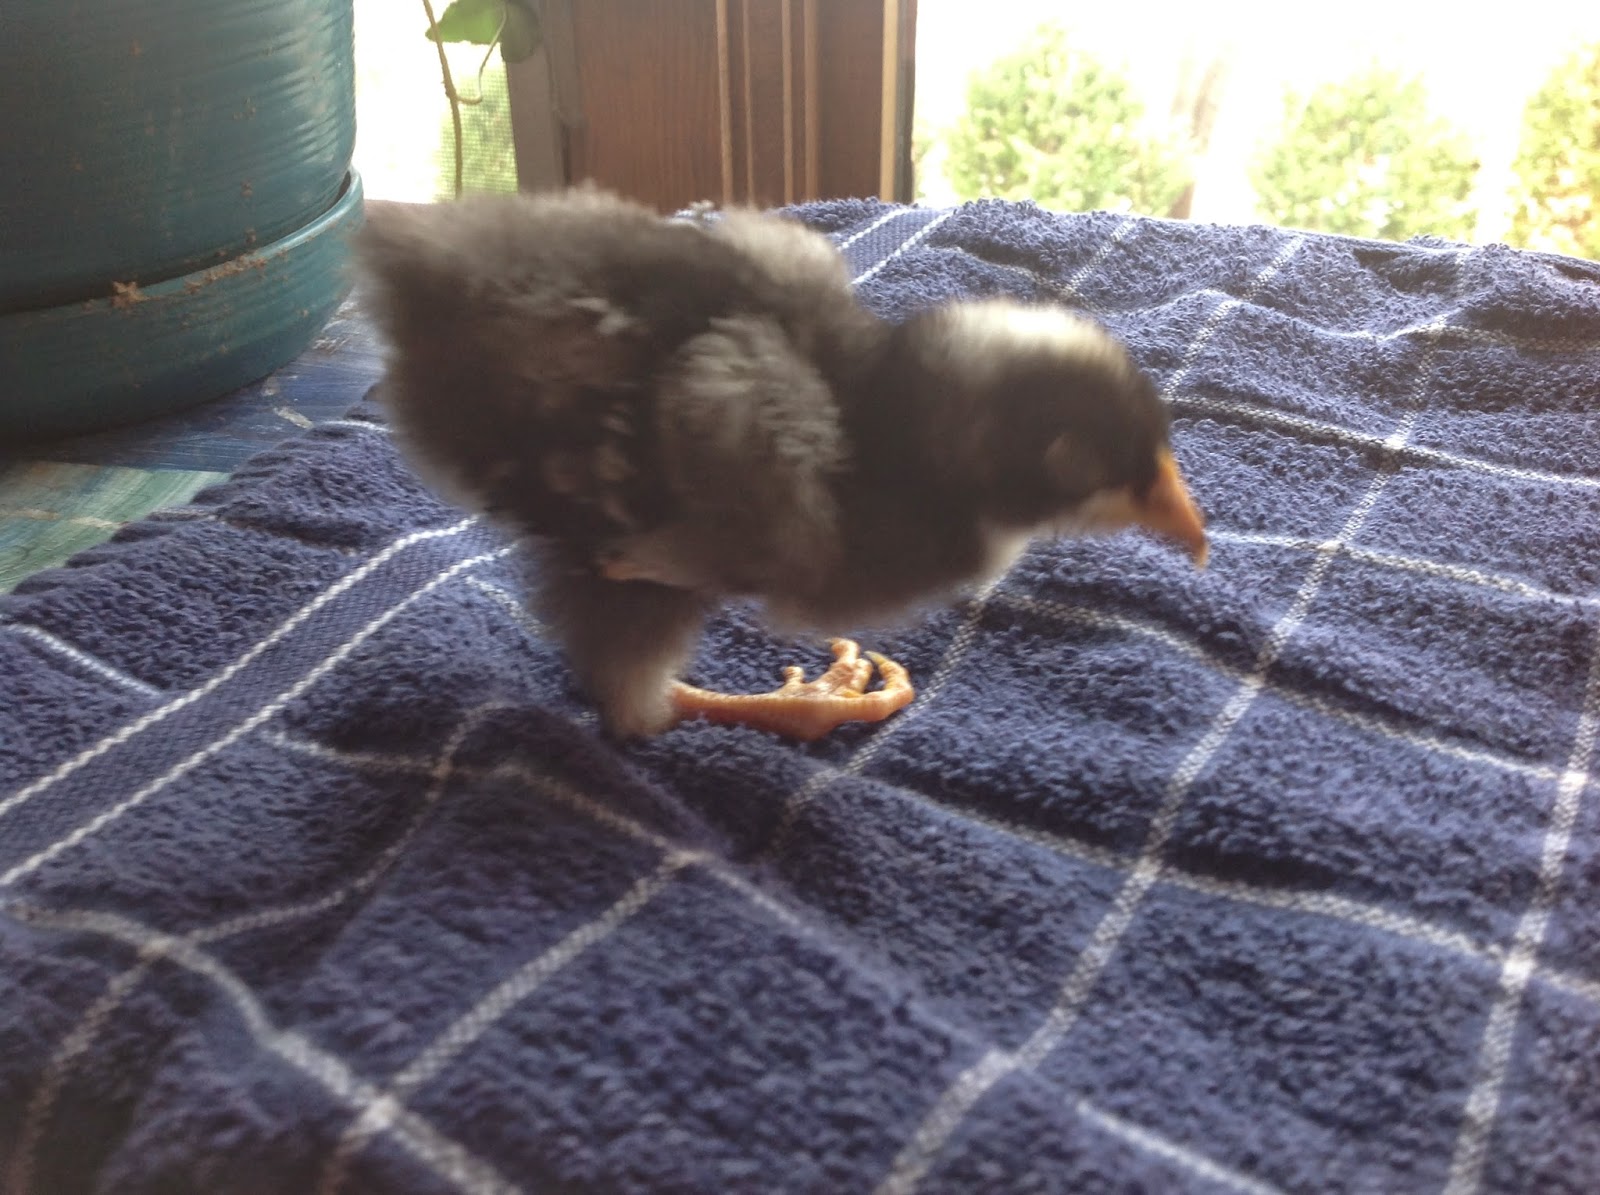
This is how it stands, on its knees instead of feet.

One leg sticks out some. 
We learned a lot.  For me, I understand that life, for certain, has its own course, and I can only help or control very little of the process.  We continue to make sure this one eats, drinks, and grows, so hopefully it will get big enough to be with the others and not get picked on too much.  I have some idea of what I will do differently in April when we will try again:

1. To have a new place in the dining room for the incubator.  NOT so much in a corner, with more open air to flow in, since it is a still air incubator. 
2. We have a new digital thermometer which also measures humidity.  This is vital in the process.
3. The thermometer will be in a different place in the incubator.
4.  We will limit eggs in the incubator to under 20, more like 12 or 15 at a time.  This should help with the open air concept inside. 
5. My goal is to turn them 5 times instead of 3.  It has to be an odd number so they don't sit on the same side very night when not turned. 

Life is amazing!  We loved watching our kids enjoy the process, and I was so excited to have them see the hatching.  We can only do our best, at the time we are trying.  I have always tried to give my all, and I realize most things in life require very little of my control, and tons of faith instead!  Check back for more on our very own baby chicks, and if you have any advice for this little Rockstar, email us with ideas :)

Wednesday, February 4, 2015

The Chicken Doctor is in!

So when you have animals, you inevitably have injuries right?  Recently we had some very eager, and hungry, chickens and there was a casualty.....
 
I as doing my morning rounds after I opened the coop and noticed fresh blood on the waterer can.  NOT good!  I don't want anymore fighting going on 'round here!  I shortly located the hurt chicken and she got a free visit to the Dr.'s office :)  Our 3 year old son was my assistant and shortly made a "pen" for her to relax in....


I simply treated it like any human wound, stopped the bleeding, assessed the injury, and made sure she was well before returning her to the yard.  Basically they were head down, chowing down, and someone got a taste her comb instead of the feed.  Talk about head/face wound!  They definitely bleed a lot just like that fat lip your sibling gave you during a play wrestling match.  She is fine, and enjoyed some lettuce while in the waiting room :)

Breakfast Anyone?

Around here we are split, about 3 breakfast eaters, 3 not so much.  Brunch is fun for us to have on the weekends when we all sleep to different time, and are hungry later in the morning.  One thing that is a staple for us is, pancakes!  I had always gotten the box mix for pancakes until I found a recipe about 1 1/2 years ago in a catholic church cookbook my mom gave me from when she used to teach for the church's school.  It is your typical family favorite recipes, most made for large families with simple ingredients.  We just LOVE this recipe.  It is so easy to whip us, I usually double it for pancakes to munch on all Saturday long, or to freeze for toaster heating later.  We use it so much I have the recipe memorized. 

And who can resist a great library find about pancakes!
2 eggs beaten
1/4 cup sugar
1 cup flour
1 cup milk
2 tblsp melted butter
2 1/2 tsp baking powder
1 tsp vanilla optional

I beat the eggs and gradually add the sugar.  The more you whisk, the fluffier your pancakes.  I add the melted butter when it is not so hot but still liquid so that it doesn't solidify into chunks in our batter.  We often add bananas while they are frying, or chocolate chips.  I like mine with walnut chunks and dried cranberries.  If the batter is a bit lumpy, its even better!  Happy Breakfast!