Wednesday, June 17, 2015

Bonfire Starters

So I get on Pinterest every so often, pin a ton of ideas, and try very few. This one though I am so pleased with I am now telling everyone about it!  We start a bonfire almost once a week.  To cook supper, have marshmallows for dessert, or to help boil water for processing.  It always took FOREVER to get the fire going.  Then I read about egg carton fire starters.  We had all the materials, which was an awesome bonus.  Frequently I am greeted by friends, public librarians, neighbors, and customers with egg cartons.  We have a large collection of them growing and some of the cardboard ones have seen better days.  I am so glad I found this pin to use simple waste products instead of throwing them away.

You need:

Cardboard egg cartons, the older the better-save them from the recycling
Old candles or leftover wax
Dryer lint-this adds up quickly
An old double boiler - or I used a large old pot with a missing handle, and a smaller pot that used to be part of a double boiler

Get your water boiling, put the wax pieces or old candles in the top pot and place it over the boiling water pot. 


Just some of the cartons ready to be reused.
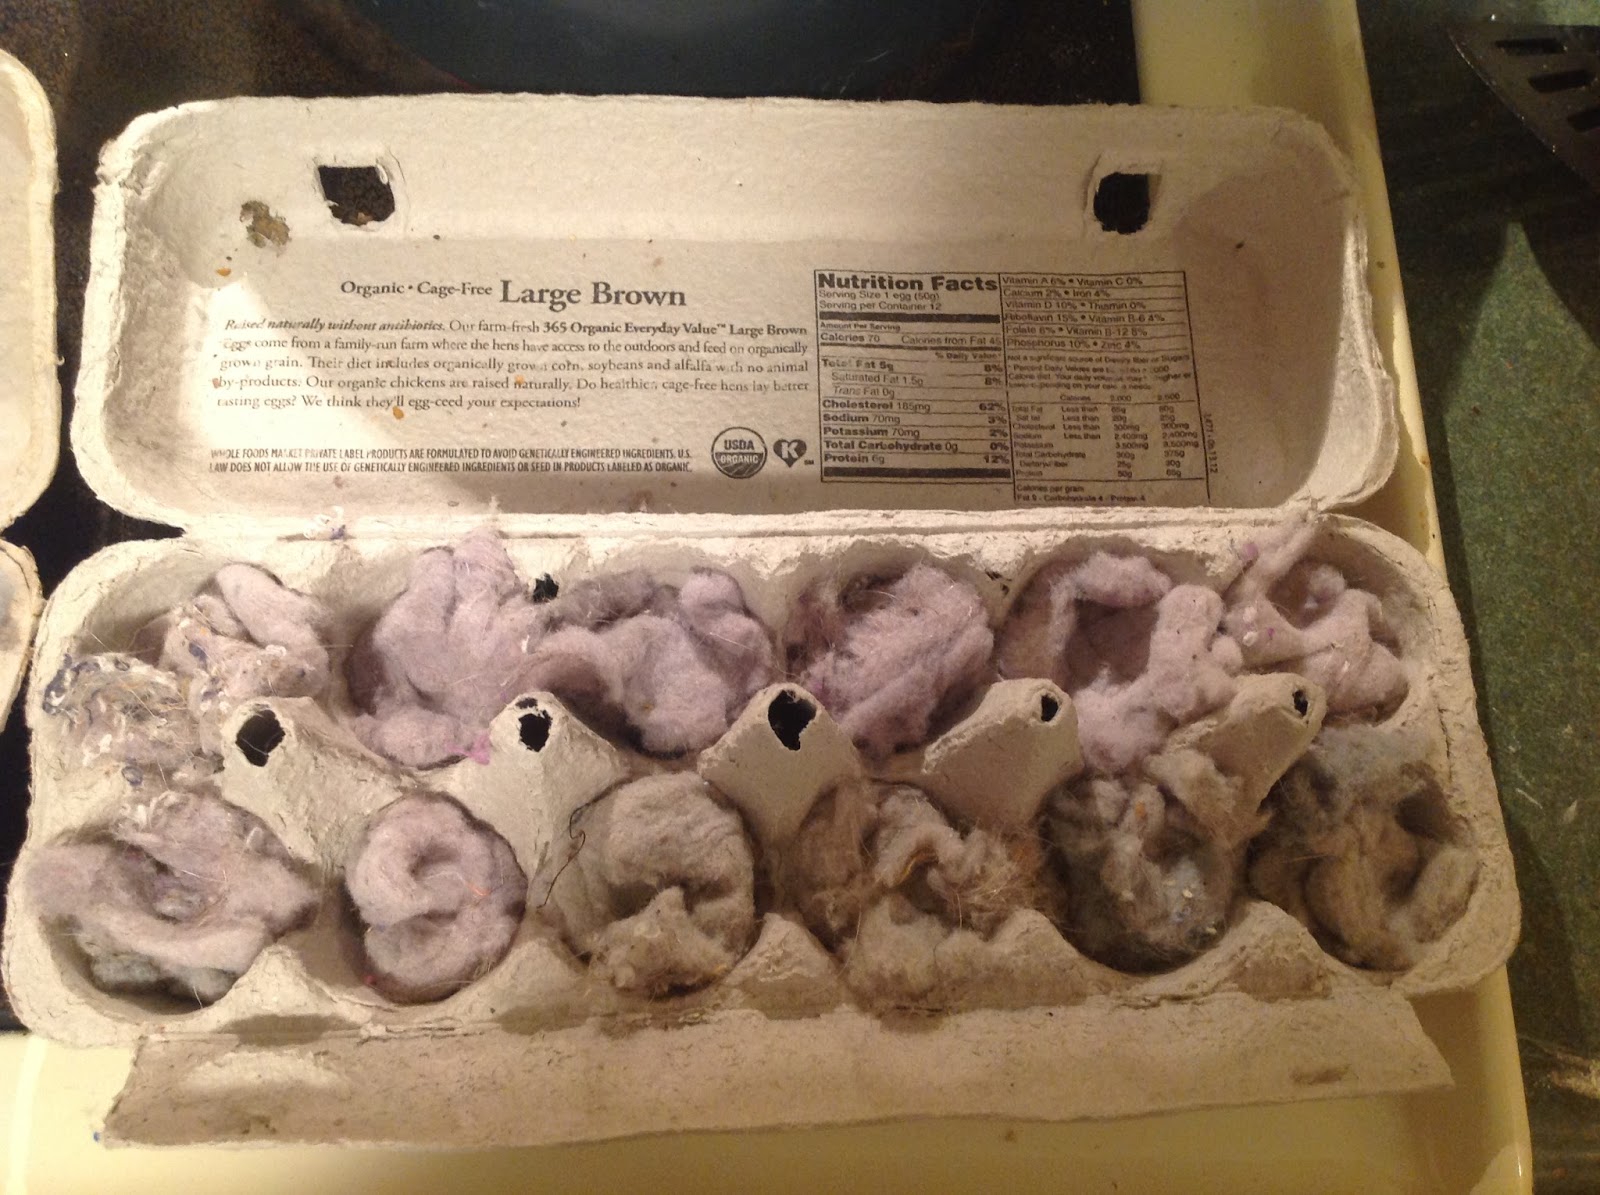
 Lovely lint from the dryer.

Some old candles from home, some saved by friends, and some found at thrift stores for cheap.


Candles melting down in my make-shift double boiler.


 While the wax is melting, stuff a small amount of lint in each egg space. 
 I used an old candle jar to pour the hot wax into and then into the carton.  This helped from getting it on the stove top. 
 
Then you let the wax harden, store the extras, and start a bonfire!
 

On this day it had rained in the morning.  You can see the fire starter lit and blazing.  I had pretty dry wood saved, but some was wet and still lit!


Add caption
The fire blazing, with a soaked ground from the rain.  I am so very please with how these work!  Try it for your home bon fire, or camping trip.  Totally worth the time it takes to heat the wax!

Monday, May 25, 2015

What's up, growing up that is, on the land.....

Some updates on what's growing around here!
 
I knew strawberries did better the second year, but OH BOY!  This is part of a second bowl full we've gotten recently.  It is so perfect!  The taste is miles better than any you could get from the store right now, just lovely.  I can't wait for more of these gems to be found! 


This large brown patch now has fast growing seedlings everywhere!  Beans along the fence, tons of squash, yellow, acorn, butternut, green squash, zucchini, and pumpkins.  I am a bit disappointed at the watermelon, but three little tiny seedlings are finally taking off up on the right.  We have rows and rows of different kinds of tomatoes to the left of the squash, potatoes and sweet potatoes on the far left, and cucumbers too mixed around towards the far end.  Mr. Hopewell randomly planted more squash, eggplant, and some random seeds towards the far end, it will be surprise gardening!


I am soooo pleased with these squash plants!

  Some of our tomatoes are now really taking off, there are bigger ones than this now that we had a week of rain, ending with sun and humidity. 

 
 Some cucumber and squash seeds that were directly sown. 

Nice little yellow squash growing strong. 

 We have sun flowers at each short end, and marigolds throughout the garden.  The newest plant in our collection was Rhubarb from the market this past weekend.  I can't wait for strawberry rhubarb pie!  My mouth is already watering!

Friday, May 22, 2015

Some rainy cold May days......

The garden is in, the new fence guarding the chickens, ducks and turkeys from the sly fox that snatch more than a few last week is up, and the rains and cold temps came in!  This called for homemade broth lovingly combined with Kale from another friend at the market who sells greens to make a delicious, hearty, and oh so nourishing soup.  I am proud to say I am more and more brave in my cooking adventures.  My friend who bakes gluten free for us at the market has totally hooked me on Kale.  She made soup for us the other day and I followed suit.  Here is what I came up with.


1 lb. sausage
1 large onion
5-6 small peppers
a bunch of cilantro
1 quart plus 1 pint soup stock, I used our chicken and pork stock
1 quart water
salt, and pepper to taste
1 tbsp. oregano
1 tbsp. garlic
diced potatoes (optional)
large bag/bundle of kale
Any other veggies you like to add, beans, carrots, celery, etc.

In a large soup/stock pot drizzle two tablespoons oil or a few tabs of butter.  Sauté one onion, and I had peppers that day so they went in.  I added salt and pepper, garlic, and oregano.  After these veggies got soft I added my broth.  About 1 quart and 1 pint.  Then I added one quart of water.  I let this start to simmer and come to a small boil before I added anything else.  I had cilantro that I forgot to sue in a recipe so that got chopped and added, along with the chopped Kale.  I had sausage front the hog we just got from the butcher.  After I fried the sausage and added it to the soup it simmered until the kale was soft.  I didn't have to add any more salt or pepper, and it hit the spot on the cold rainy days this week.  Enjoy!

A sweet request.....

So at the market we meet many many people.  Some have become regulars already, many are new for the day, and a few are vendors we have become friends with.  We regularly see our friend from Mushrooms Naturally.  He has a very cool story, from Sous Chef to Mushroom farmer.  There is our friend who has a soap business with her husband, S&S Soap, the spice lady, barrel furniture guy, cutting board man, Meat market guy with Polish decent, a couple starting a farm who also just started marketing, the young couple who bake artisan bread, the lady with pottery.  And so many more!  Then there is the older gentleman who came up to ask me about Date Nut bread.  His request was for date but bread like his mother used to make.  His wife tried after the first week he asked me, I didn't have a recipe, and hers was not dark enough I guess.  So I felt bad, honestly I didn't know if he was serious,mand started researching.  I had big shoes to fill as he had not had any since his mother passed, and I felt the pressure.  I asked friends and family, searched my old church cook books, the Internet, and asked mom.  I found the basic recipe to be the same, just some minor variations.  I did not go with the recipe that called for alcohol since I wanted to start with a simple formula. And.......


Mr. Hopewell declares it is the absolutee best bread I have made.  He prefers the rich dense bread compared to the more dry cake like texture we seem to love in this country.  He liked it so much he didn't want me to sell it!  Tonight I found this.......

Just minutes after I took it from the oven!  He said when warm it tasted so similar to a traditional bread pudding from down south and I totally agree!

We will find out the verdict of my special customer this Saturday, but after his wife took three of the mini-loaves, and we promptly sold the other two I had, it seems promising that this recipe will be a hit.  I have six more loaves in the oven as I write this, and I am sure two will be gone by Saturday!  If you'd like to try, enjoy!

I cup dried dates chopped
1 cup boiling water
1 tsp baking soda

Pour boiling water over dates and baking soda.  Let the mixture cool completely.

Cream together
1/2 cup butter(softened)
1 cup sugar
1 egg

Add one cup flour, 1 tsp vanilla, and 1 cup chopped walnuts.  Mix a few times to incorporate, then add the date/water/baking soda mixture.  Mix together. Bake at 350 degrees, a large loaf pan 40 minutes, mini loaves about 25-30 minutes.  The bread will appear dark and almost seem burnt in color.


Saturday, May 16, 2015

Did you know we got ducks?

Many customers and friends at the market come by and see out chicken pictures.  They love seeing what we have out here laying the beautiful brown jewels they come to the market to buy.  We chat about what varieties we have, what will start laying this summer, and then I mention we have ducks!  We were again at the farm store getting feed and they just so happened to be getting their last and HUGE order of chicks.  This led to a discussion about what they had in the back too, and there were some ducks and turkeys that were older and needed a home.  We got them for less than retail since they were older.  7 Peking Ducks, and 9 white turkeys.  One duck was a runt with a leg issue so it was thrown in for free, "just in case". 
Here they are on their first field trip to the yard and a mud hole from the rainstorm they had a great time getting dirty in.

Little tiny Puddle the yellow duck under the light was in the house for a while until his feet got under him.  I think the turkeys think they are ducks too :)


Fast forward about four weeks and looky here!  They are HUGE!  We are excited to find out if they are boys are girls soon.  I have read that boys have a curled feather on their tail, and a lower more raspy sounding quack.  While girls have the normal quack you would think of when listening to a duck.  These are usually raised for meat but we are keeping them for eggs first to see how that goes. I have read that they can start laying within 7 months, so lets hope it is sooner than later!  I can't wait for Duck eggs!


As they are free ranging now a tragedy happened this week.  I came home after helping at the school to find three turkeys and our beloved Puddle dead in the grass.  It looked like something just killed them and didn't take them or eat them.  We are sad, but know that this is nature too.  Our little farm girl said some words as daddy buried them, and we are celebrating their life this Sunday with cake, homemade ice cream, and some outside fun, probably in the water :)  We better leave the dogs outside when we are gone from now on!

Wednesday, April 22, 2015

Do you think we have enough garden this year?

I have always LOVED gardening.  It seems deep down somewhere it is in my blood.  I have many treasured memories of planting flowers with my Grandpa Al, he always had roses, a bleeding heart plant, petunias, and the Dusty Miller plants always edged his flower bed.  I have added a rose for each kiddo in our front landscape, will be transplanting a bleeding heart from a friend, and am pondering what edging to add.  With this green thumb, and my husband's drive to be a farmer, this year we relocated our garden and increased the size.......


He just kept tilling more and more :)

 
Add caption
 
 
We started off with many many pots, mostly with popsicle stick to remember what we planted.  The puppy stole most of the sticks,  I guess we are in for some surprises!


 I am always in AWE of the way things grow.  Here is a very large tomato plant compared to the seed that is still hanging onto one of the leaves.  From something so small comes a plant, then food for us.  AMAZING!


Ready for transplanting to paper pots


Some plants we started, and some indoor plants I am not always good at keeping alive through winter. 


I absolutely LOVE these newspaper pots!  They have held together better than I expected, and now planting in the garden gives the seedlings extra protection as they grow, the roots are hardly disturbed for quicker transplanting, and the paper and masking tape composts into the ground.  I asked my librarian friends at the local library for old newspapers they were going to recycle, and here you are!  TONS of paper pots for transplanting!  Check back for produce!

Monday, April 13, 2015

Farmers Market

So part of our new adventure with our farm and the LLC is to attend the closest farmer's market.  We were lucky enough to be accepted for the entire season as a new vendor, and after two weeks have had great fun, learned a lot, and made it a family affair!  After week one we had a list of things to improve, since we had never set up a stand such as this it helped to get one day under our belt to see  what we needed.  After adding some home made signage, more table clothes, and a better display for our corn heating bags, we feel it was successful!  It was so fun to share pictures of our chickens to make buying our food more personal.  So MANY, MANY people stopped by to look at the pictures and chat about their experience with chickens.  Some own their own, grew up with them, checked for eggs at their grandparents farm, walked around as a kid with a rooster on their head, or remember roosters chasing them around the yard :)  It attracted a lot of attention.

  This lady was the hit of the morning!

I also offered min-muffins as samples of my quick breads this week.  It was an easy addition and a hit.  Many adults tried them, then purchased a loaf or bag of muffins, and some kids got their breakfast from our stand.  I definitely will be doing this more often.  I offered larger muffins for sale with the quick bread loaves, and that was also  a hit.  I think  I will take a break from my French bread, also since there is a great bread stand at the market, and focus on quick breads, eggs, and corn bags until our garden produce is ready.  Garden set up happened this weekend so more on that soon!  
I was very proud we made our sign from scrap wood on our property, and leftover house paint!
Mr. Hopewell did awesome helping set up, make change, and take kiddos to the bathroom :)
 I was so excited that Mr. Hopewell's display idea for the bags, along with a friend's idea for a display board, worked!  We sold 7 bags in one morning!  The most ever, as we had been giving them as gifts and didn't sell any the first day but had lots of interest.  I am a bit excited since my new sewing skills are really working out, and it was nice to have others I don't know enjoy what I made. 
This is our updated corn hearing bag display.  Now you can see the explanation board, many types of fabrics we use, and our sizes.  You heat them in the microwave and the corn holds the heat longer than rice seems to.  They were a hit!

Using our chalkboards from home to list our goods, and of course the rooster picture mom and dad made us!

I am very happy with our stand right now and probably won't make any major adjustments for a while. 
 
CORN Heating Bags!
Just some of the prints I found on sale, or in the remnant pile at the fabric store.  It is a perfect first project for this beginning sewer, since my skills come from my middle school Home Ec classes. 
A long bag perfect for sore neck muscles.  This print was snatched up, have to make some more!


Cold toes love warm beds to crawl into at night :)

This is common to see at our house as one of the daughters gets growing pains quite often.  She always requests a warm bag to sleep with. 
 We are having so much fun, and teaching the kids many life lessons this year.  I can't wait to see what is in store for the season!  This weekend we had helpers in the garden, friends over for pork chops on the grill pit, and beautiful weather for getting dirty in the woods.  Here's to all the blessing we have had our entire lives, but especially since finding our home.  Get out and get some fresh air!  The buds and flowers are amazing!

Monday, April 6, 2015

A new coop, from old materials.....

So, we had our large chickens in our "old" coop and they were happy, but with the arrival of more we needed a bigger coop and free ranging area.  They were allowed all over our property, but without a fence around it they ventured across the road, or to the neighbors.  Not everyone loves chicken poop on their yard so we had to do something!  My husband, Mr. Hopewell we dub him, came up with a plan.  He found a hay wagon for sale online nearby and purchased it as we made plans.  He then started collecting materials.  We found some scrap wood around the property, used 2X4s from the small coop that were roosting boards, purchased windows from the local Habitat for Humanity Restore, used our old basement door, and got some free pallets from one of the home improvement stores.  We did need to purchase new 2X4s for the frame, nails and screws, roofing(which he got about 1/2 price since it was damaged), and some siding(which was also almost 1/2 price at the store since it was damaged.).  It is amazing what you can scrounge up!  It is not the prettiest coop, but the chickens seems to LOVE it! 

Mr. Hopewell and some of the kiddos showing off the coop. 
 The lower window opens to let chickens in.  The larger window does not open but streams in sunlight, helping them know when the sun rises and they should start laying.

The larger door,  we need to work on a latch to hold it open. 
 They have a large fenced in yard for now, until we can fence more of the wooded property, and make a fenced path to the garden so they can work on bug control this summer.  We needed a smaller area to start so they would know where to return at night. 

Someone wants to try a nesting box before they are even finished!

Roosting spaces for those who like to sleep high. 

Inside view of the boxes, unfinished, they are finished now.  He will add another row above.

The youngest at the time, about 2 1/2 months old, those beautiful Ameraucanas and Rhode Island Reds joined the flock. 

They are so curious!  Night is falling they are getting ready to rest. 

We added a sturdy ladder from logs we found on the property and cedar branches. 

Another ladder for the window door. 

This is much better for their food and water than before.  Now it is under the roof overhang so when it rains it doesn't get ruined, and we can catch extra water in buckets to use. 

You coming up?

They must like it!